| Uploading
your files with WS FTP Home : Hosting Documentation : Uploading your files with WS FTP |
[View Flash Tutorial]
This explains how to setup FTP to upload your files from your computer to your website. We recommend using WS FTP Pro or WS FTP LE (free). Other FTP programs can be used and will follow similar steps as are shown below. We offer instructions specifically for configuring WS FTP LE below.
Important: If you are using any FTP Program, be sure you are uploading to the correct directory and that your home page is called index.html. Otherwise, you won't be able to view your pages after you upload them. If you can go "up" a directory when you log in using FTP, go up as far as you can and then into the /web folder.
-Correct Directory to Upload: /www/ or /public_html/
-Incorrect Directory to Upload: /
-Correct Home Page Name: index.html or
index.htm (if index.html has been deleted)
-Incorrect Home Page Name: Main.html or homepage.html or index.HTML
(must be lowercase .html and lowercase index)
-Correct Host Name: xyz.com or 207.23.23.12 (use your domain
or IP address)
-Incorrect Host Name: ftp.xzy.com or ftp.207.23.23.12
-Remote Host Directory: /www
Login Information
The following information is contained within your account activation notice and is needed to connect you to your website via FTP:
Your User Name........(case sensitive)
Your Password..........(case sensitive)
Your Host Address.... yourdomain.com or your IP address
("IP address" is the numerical address assigned to every account.
For the first few days, until your domain name is registered or transferred,
this will be the only way you can connect).
Using WS_FTP
Each time you run WS_FTP the Session Profile window will be displayed.
A profile contains the information needed to connect to your website.
Creating a profile now will eliminate the need for you to configure the
software each time you wish to connect to the web server via FTP. To create
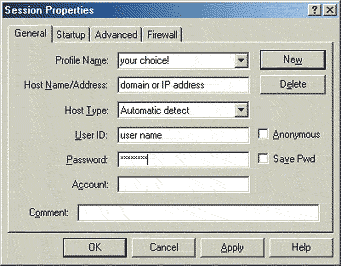
a profile, click the "New" button and enter a generic profile
name at the top of the Session Profile window, such as "My Website."
Next, enter your Host Name/Address (yourdomain.com), User ID (User Name),
and Password for your website as illustrated in Figure 1A.

Figure 1A
Next you need to click "OK" to continue. This will connect
you to the webserver, where you will connect directly to the root ("home")
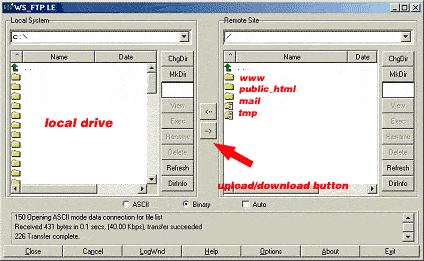
directory of your account. WS_FTP will display a split screen where files
on the left-hand side are within your own computer. You will see several
folders on the right-hand side as illustrated in Figure 1B.

Figure 1B
Double click on www to get to your web directory. This is where all your files will be downloaded, and/or you will create subdirectories. The one unique system directory that you may want to use is cgi-bin; this directory is reserved for custom Perl/CGI scripts. To make your home page load automatically, name the HTML document "index.html" in lowercase and upload it to the /www directory of your account. If you access your site (www.yourdomain.com) and see a page that says, "Welcome to your hosting account" that means you have not uploaded your "index.html" file correctly.
To upload a file or files, simply highlight the file(s) on the left and click the right arrow button (->) in the center of the window. Be sure to upload HTML documents and scripts in ASCII mode and images in Binary mode. To transfer a file to a subdirectory, double-click the appropriate subdirectory to open it before transferring the desired file(s). To create a new directory, click on the MkDir button when you are inside the www directory or subdirectory.
As soon as a file is uploaded to the web server, it is available for
all to see. If, after uploading a file, you are still unable to see the
updated file via your browser, try hitting the "Refresh" or
"Reload" button. If that fails, you need to clear both disk
and browser cache. This function can be found by selecting Options
- Network Preferences in Netscape, and Tools - Internet
Options in Internet Explorer. Remember that you must first be
connected to the Internet through your local Internet service provider
in order to connect to the web server.
HINT: If you're behind a firewall, router or sharing systems (NAT)
make sure "Passive Mode" is enabled in WS_FTP! Not doing so will
cause you trouble accessing your site via FTP!
IMPORTANT NOTES:
- All passwords, usernames, and file names are case sensitive. Example: if you typed FILENAME.GIF in your HTML document but named your file filename.gif it would not work. They must match up in order for your page to show up properly.
- Any and all files you want to be accessed via a web browser must be placed in your www directory.
|
