| Uploading
your files with CuteFTP Home : Hosting Documentation : Uploading your files with CuteFTP |
[View Flash Tutorial]
This explains how to setup FTP to upload your files from your computer to your website. In this section we will show you how to connect using CuteFTP. Other FTP programs can be used and will follow similar steps as are shown below. We offer instructions specifically for configuring CuteFTP (non-pro) below.
Important: If you are using any FTP Program, be sure you are uploading to the correct directory and that your home page is called index.html. Otherwise, you won't be able to view your pages after you upload them. If you can go "up" a directory when you log in using FTP, go up as far as you can and then into the /web folder.
-Correct Directory to Upload: /www/ or /public_html/
-Incorrect Directory to Upload: /
-Correct Home Page Name: index.html or
index.htm (if index.html has been deleted)
-Incorrect Home Page Name: Main.html or homepage.html or index.HTML
(must be lowercase .html and lowercase index)
-Correct Host Name: xyz.com or 207.23.23.12 (use your domain
or IP address)
-Incorrect Host Name: ftp.xzy.com or ftp.207.23.23.12
-Remote Host Directory: /www
Login Information
The following information is contained within your account activation notice and is needed to connect you to your website via FTP:
Your User Name........(case sensitive)
Your Password..........(case sensitive)
Your Host Address.... yourdomain.com or your IP address
("IP address" is the numerical address assigned to every account.
For the first few days, until your domain name is registered or transferred,
this will be the only way you can connect).
Using CuteFTP
Please note that there are a number of older and current versions of Cute FTP floating around. As a result, some of the instructions provided here cannot possibly reflect all the versions, which have been released in the past 5 years. The only small difference you may encounter is where some of the options can be found (depending on the client version you're using). In any event, everything is pretty well much the same. Let's get started:
1. When CuteFTP is loaded the first time, the a window will appear. If
the window doesn't appear, press the F4 function key or select File ->
Site Manager.

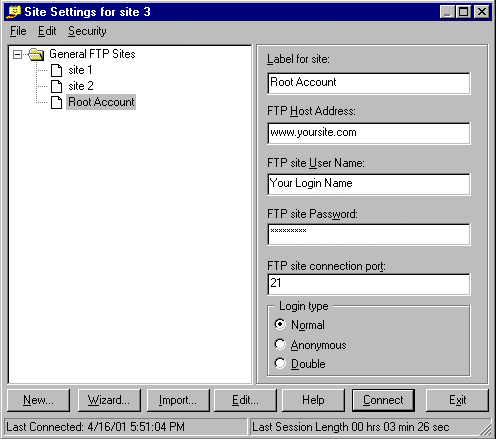
2. Click on General FTP Sites and then click on "New"
3. Add the following to the FTP Site Edit window
- Enter a name for this account. For example, "My Root Account."
- Enter your domain name OR IP address in Host Address (either one)
- Enter your username and password in the appropriate boxes
- Enter 21 for the port
- Make sure Login type is Normal
- Hit connect!
Once your in, upload to the directory called WWW or public_html.
HINT: If you're behind a firewall, router or sharing systems (NAT)
make sure "Passive Mode" is enabled in CuteFTP! Not doing so will
cause you trouble accessing your site via FTP!
IMPORTANT NOTES:
- All passwords, usernames, and file names are case sensitive. Example: if you typed FILENAME.GIF in your HTML document but named your file filename.gif it would not work. They must match up in order for your page to show up properly.
- Any and all files you want to be accessed via a web browser must be placed in your www directory.
|
