| Configuring
Outlook Express Home : Hosting Documentation : How to Configure Outlook Express to Check Your E-mail |
If you would like to add an e-mail address to Outlook Express, follow the procedure below. You can configure Outlook Express to check as many e-mail addresses as you like.
To quicky and automatically setup your mail accounts:
You can use the control panel's automatic Outlook Export Tool to setup your email account. To do this:
1. Log into your control panel (http://www.your-domain.com/cpanel/)
2. Select "Add/Remove POP Accounts"
3. Select "Outlook Express AutoConfig" next to the account you want steup.
Once clicked, the server sends a registry file to your computer so that when Windows reads it, it will automatically setup your mail account in Outlook Express. If you would like to manually setup your mail accounts in Outlook Express, follow the instructions below.
To manually add e-mail accounts in Outlook Express:
1. Open Outlook Express
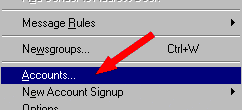
2. Move to the "Tools" drop down menu and select "Accounts."
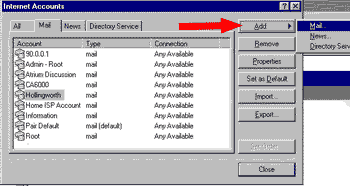
3. Select "Add Mail" from the "Right" menu option.
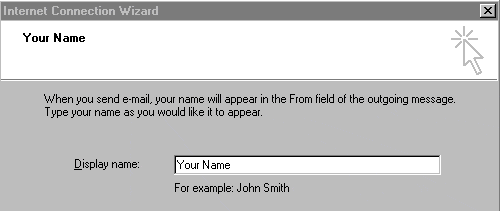
4. In the "account name box", enter a name for your mail account, and click "Next."
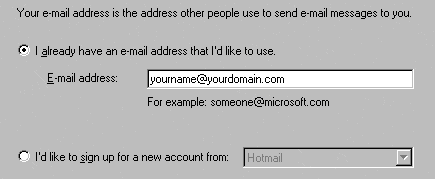
4. In the "Email Box", enter the email address for this account and click "Next."
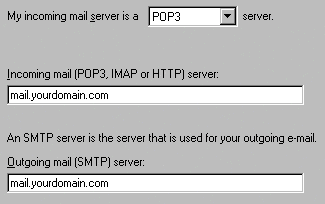
5. Set "Mail Server Names"
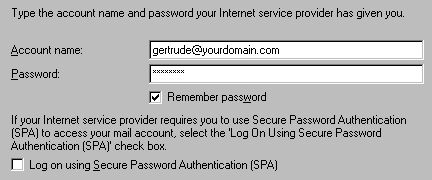
6. Enter the "Login and Password" for this email account. Use the "full email address" as the login name of the account you're configuring, as illustrated in the following "example."
7. Click "Finish." and you'll see a message like this:

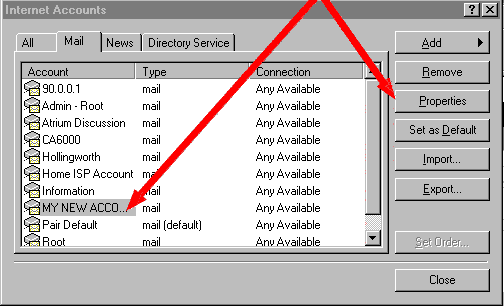
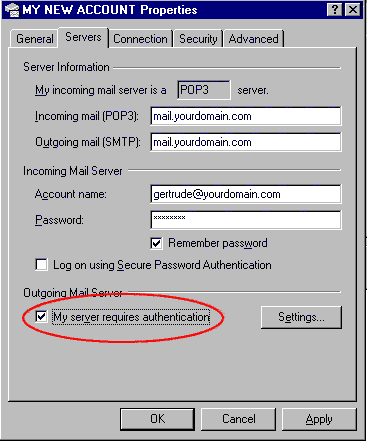
8. Do not exit your account settings yet! Highlight your "New Account" and select "Properties." as illustrated in the following example:
9. In the properties dialog box, select "Servers", then select the "My Server Requires Authentication" option as shown below:
That's pretty well it! Close your account settings and test out your new address by sending a message to it. If you're able to send a message, and receive that same message in your new account, then congratulations! - you've successfully setup your first email account on our servers. You can configure as many email accounts as your like in Outlook Express using the same above process.
Potential problems with
sending mail:
Due the the mass amount of abuse from a few problem souls, an increasing
number of ISP's are disabling ability to "send mail" through
someone else's SMTP server. If you receive an error message
when attempting to use our "Outgoing SMTP" server, it probably
means your ISP has denied access to (what is otherwise known) as 'third
party relaying." To solve this problem, simply go back to your
account properties, and select the "server settings" tab. Then,
there are two things you must do:
1. Change the "SMTP Outgoing Mail Server" settings to the same ones as you're using on your ISP's email account. To do this, have a look at "Step 8" just a few above this one. In this case, select the properties of your ISP mail account, then go to properties, and select "Servers." Copy those "SMTP Outgoing Mail Server" settings to your new account, or write them down and enter them in manually.
2. Deselect the "My Server Requires Authentication" option.
DO NOT CHANGE ANYTHING ELSE! You can now receive mail from your domain account, while sending mail will be accomplished through your ISP's SMTP servers. This will in no way effect the performance or look of your email messages coming from your domain.
Note: PLEASE… DO NOT send large volumes of mailings through our SMTP Relay server. It's really provided as a courtesy to our users, and not something to be used for mass mailing list purposes. If you're sending large emails, or are running a mailing list, PLEASE use your ISP's mail server for this purpose. They are better setup for this sort of heavy duty usage, and you won't clog our SMTP server, which also needs to provide resources to other users.
|