| Email
Auto Responders Home : Hosting Documentation : Setting up Email Auto Responders |
What is an Email Auto Responder?
Email auto responders will automatically send a customized auto response (that you compose) to any visitor whom emails the address configured with one. More specifically, automated responses are sometimes used to send additional information about your service or product by having a visitor email something like moreinfo@yourdomain.com. In most other cases, they are used to send a 'courtesy reply' to anyone whom sends a query to your companies main email address. When visitors email this address, they recieve a response such as:
Thanks for contacting our company! Someone will be returning a response to your question soon. If you require immediate assistance, please call 555-555-5555. Thanks!), and so forth.
There are two types of Auto Responders:
The silent Auto Responder:
In this case, you configure the responder to send the desired information when it's emailed, however you 'do not' receive copies of the inquiries that people originally sent. This method is typically used if you have a product and want people to email an address for additional information on it. You simply tell them to email moreinfo@yourdomain.com, and they receive additional information on it. Again, you 'will not' receive receipts of the visitors emailing the auto responder. If you want to do this, please read the next paragraph.
The Auto Responder that sends you the original inquiry:
In this case, the auto responder is setup to work with a (currently configured pop email account). Now, the sender receives your automated response, and you receive their 'original inquiry'.
How to setup an Auto Responder:
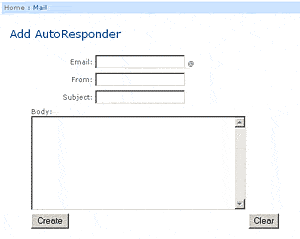
1. Login to your control panel (http://www.your-domain.com/cpanel/)
2. Select "Setup AutoResponders"
3. Select "Add Auto Responder"
4. Enter the "Email Address" to send the auto response
5. Enter a "From" name, (for example, my company)
6. Enter a "Subject", (for example, thank you)
7. Enter your message in the "Body" area
Select "Create" and that's it! Your auto responder is now online. To test it, email its address and see if you receive the auto response. If you've configured it to an existing pop mail account, you should receive 2 responses. The first, which is your inquiry, (that you just sent to yourself), and the second, which will be the automated response.
Remember! If you
want to receive the "Incoming Inquiries" in addition to sending the automated
response, then add an email address, which is "already" configured
as a "pop email account." If you "do not" wish to receive the original
incoming inquiry, then simply enter a name, which is not configured as
one of your existing pop mail accounts. If at anytime you want to update,
edit, or delete an auto response, simply go back into "Setup Auto responders"
and you'll see the current responders configured, as well as options beside
each of them to change or delete.
|